
Creating a subdomain in Hostinger is quick and beginner-friendly. You simply log into your account, navigate to the domain settings, enter your desired subdomain name, and click create. Whether you’re using hPanel or cPanel, Hostinger allows you to set up subdomains in just a few steps – perfect for blogs, shops, or test environments.
How To Create A Subdomain Using Hostinger’s HPanel?
Hostinger’s hPanel is a user-friendly interface tailored for beginners and experienced users alike. Follow these steps to create a subdomain in just a few minutes:
Step 1: Log in to your Hostinger account
Visit hostinger.com and sign into your account. Once logged in, you’ll be taken to your dashboard, where all your services are listed.
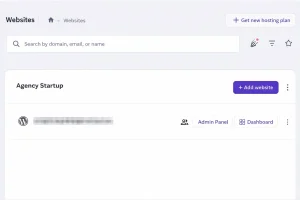
Step 2: Navigate to the Websites section
From the main dashboard, locate the Websites section. Find the domain name you want to add the subdomain to, then click the Manage button next to it.
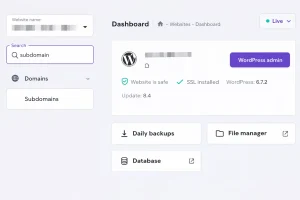
Step 3: Access the Subdomains menu
In the left-hand sidebar, scroll and click on Subdomains. This is where you’ll create and manage all your subdomains.
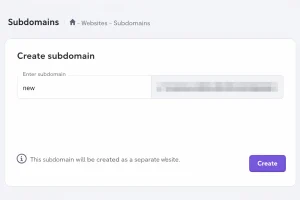
Step 4: Enter your subdomain name
In the “Create a New Subdomain” field, type the name of the subdomain you’d like to create (e.g., shop if you want shop.yourdomain.com).
Step 5: Choose a custom folder (optional)
You can select a custom directory/folder (e.g., _shop) where your subdomain files will be stored. This helps keep your files organised and separate from your main site.
Step 6: Click Create
Click the Create button to finalise the process. The subdomain will now appear in your subdomain list.
Step 7: Wait for DNS propagation
Although the subdomain is created instantly, it may take a few minutes to a couple of hours for DNS changes to propagate globally. You’ll then be able to access it live on the web.
This process is ideal for creating a blog, a staging site, or even hosting a completely separate project under the same domain.
How To Create A Subdomain Using CPanel (If Applicable)
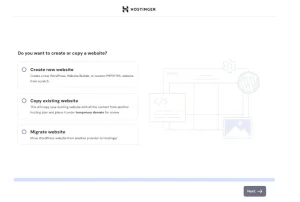
If your Hostinger hosting plan includes traditional cPanel instead of hPanel, the subdomain creation process is slightly different but equally simple. Here’s how to do it:
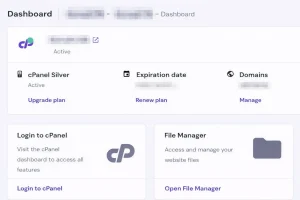
Step 1: Log in to your cPanel account
Go to your Hostinger control panel and access cPanel. You’ll be presented with the standard cPanel interface, commonly used across many web hosts.
Step 2: Locate the Domains section
Scroll down to the Domains section on the main cPanel dashboard. Depending on your interface, click either Domains or Subdomains.
Step 3: Click Create a New Domain
Click the button labelled Create a New Domain. This allows you to add a subdomain or even a completely separate domain.
Step 4: Enter your subdomain details
In the “Domain” field, input your full subdomain address (e.g., blog.yourdomain.com). Make sure you don’t include “http://” or “www.”
Step 5: Uncheck Share document root
You’ll see an option to Share document root with the main domain. Uncheck this to ensure the subdomain has its own folder and won’t mix files with your main site.
Step 6: Choose your document root directory
Define the directory where the subdomain’s files will be stored (e.g., /public_html/blog). This folder is automatically created if it doesn’t exist.
Step 7: Click Submit
Click Submit to finish the process. Your subdomain is now set up and can be accessed once DNS settings update.
This method is great for users familiar with cPanel and offers slightly more manual control over root folder configurations.
Is Creating A Subdomain In Hostinger Free Of Cost?
Yes, creating subdomains in Hostinger is free if you have an active hosting plan.
- Web Hosting Plans: Include up to 100 subdomains.
- Cloud Hosting Plans: Offer up to 300 subdomains.
- Domain Only (No Hosting): You can still create subdomain records in DNS, free of charge, but can’t host content without a hosting plan.
| Hosting Type | Subdomains Included | Cost |
|---|---|---|
| Web Hosting | Up to 100 | Free |
| Cloud Hosting | Up to 300 | Free |
| Domain Only | Unlimited DNS subdomains (no hosting) | Free |
Can I Install WordPress On A Hostinger Subdomain?
Yes, you can install WordPress on your subdomain through the Auto Installer in hPanel:
- Create the subdomain first.
- Open the Dashboard for your site in Hostinger.
- Click Auto Installer from the left menu.
- Choose WordPress and fill in your site details.
- In Advanced settings, select your subdomain from the dropdown list.
- Click Install.
WordPress will now be installed on the subdomain, separate from your main site.
What Should I Do If My Hostinger Subdomain Is Not Working?
If your subdomain doesn’t work right away, consider the following:
- DNS Propagation: It may take a few minutes to hours.
- Clear Browser Cache: Try an incognito window or a different browser.
- DNS Records: Ensure the A record points correctly.
- File Structure: Make sure your subdomain folder contains website files or CMS.
Still facing issues? Hostinger’s support can help resolve DNS or setup problems quickly.
Can I Create A Subdomain In CPanel With Hostinger?
If your Hostinger plan uses cPanel:
- Log in to cPanel.
- Click Domains or Subdomains under the Domains section.
- Click Create a New Domain.
- Enter your subdomain (e.g., blog.yourdomain.com).
- Uncheck Share document root.
- Choose the directory for your files (e.g., /public_html/blog).
- Click Submit.
This gives the subdomain its own folder and web space.
How Many Subdomains Can I Have With A Hostinger Domain?
The number of subdomains depends on your hosting plan:
- Web Hosting: Up to 100
- Cloud Hosting: Up to 300
- Domain Only (DNS use): Virtually unlimited subdomain records
These limits let you create dedicated areas like blogs, shops, or app sections under your domain.
Conclusion
Setting up a subdomain in Hostinger is a straightforward process with no added cost on hosting plans. Whether you’re expanding your site or testing new features, subdomains offer flexibility and control. With Hostinger’s hPanel and tools like Auto Installer, managing multiple web environments is simple and beginner-friendly.
If you want a deeper breakdown of Hostinger’s features, pricing, and real-world performance, read our Hostinger reviews to learn more.
Frequently Asked Questions
Do I Need To Buy A New Domain To Create A Subdomain In Hostinger?
No, subdomains are created from your existing domain.
Can I Host Different Websites Under Subdomains In Hostinger?
Yes, each subdomain can run its own website or CMS.
Does Hostinger Support SSL For Subdomains?
Yes, free SSL via Let’s Encrypt is available for subdomains.
How Long Does It Take For A Subdomain To Start Working?
Usually within minutes, though DNS may take up to 24 hours.
Can I Set Up Email Accounts For Subdomains In Hostinger?
Not directly. Email is typically linked to the main domain, but advanced configurations are possible.